
VIRTUAL BACKPACKING:
Where Do You Really Want to Go Today?
 As we headed up the braided river, it seemed that the plane's wheels were skimming the surface of the water. It was clear that the gorge was narrowing quickly, and that a huge waterfall loomed ahead. A couple of banking turns took us over the jagged peaks of Alaska's Wrangell Mtns. We broke out over the Russell Glacier and the Skolai plain. A glance to the left confirmed our dread.
The bunched lines on the topo map translated into a steep wall, which we would have to climb to access the remainder of our trip. We touched down seconds later, landing to the northwest, taking advantage of the local winds.
As we headed up the braided river, it seemed that the plane's wheels were skimming the surface of the water. It was clear that the gorge was narrowing quickly, and that a huge waterfall loomed ahead. A couple of banking turns took us over the jagged peaks of Alaska's Wrangell Mtns. We broke out over the Russell Glacier and the Skolai plain. A glance to the left confirmed our dread.
The bunched lines on the topo map translated into a steep wall, which we would have to climb to access the remainder of our trip. We touched down seconds later, landing to the northwest, taking advantage of the local winds.
The approach flight to a great backpack courtesy of McCarthy's best bush pilot? No, just a 50 second animation produced by Vistapro, a powerful piece of software. The entire "flight" had taken place in the confines of our multipurpose room, at a time of year when the Wrangells are covered with snow.
I was first introduced to Vistapro(VP) in the early 90's. I was in a meeting with a fellow from the US Geological Survey (USGS). I was expressing longing for a software program which would let me highlight a trail on a topo map, and draw a vertical profile of the route. He said, "Why not try something better: Vistapro will actually draw a picture of your view." To say that a VP image of the terrain is better than getting a two dimensional rendering of your route is like saying that driving the Going-to-the-Sun highway through Glacier National Park is better than driving on the expressway on Manhattan's Lower East Side. But don't get me wrong: I really enjoy the 2D profiling capabilities of modern topographic mapping software.
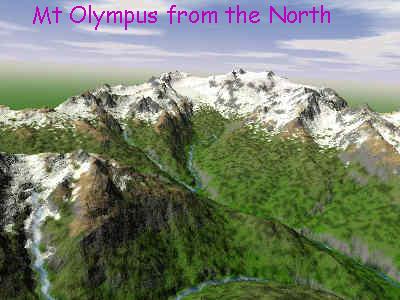
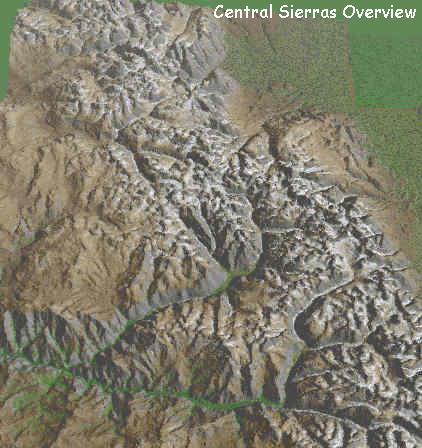
Vistapro is a truly amazing piece of software which should be at least of passing interest to anyone who owns a computer and likes to hike or backpack. Simply put, VP generates accurate 3-dimensional images of land forms. Essentially, it lets you take a long, hard look at, for example, that high lakes basin you want to traverse on your next trip to the Sierras, or that canyon system you need to cross next month. Basically, you "feed" VP with specialized files called digital elevation models (DEMs), which you can think of as a digitized topographical map. You take VP's camera, position the target, snap the picture and let it develop ("render" in VP language) before your eyes. Want to see what it looks like up that valley to the right? Simple: just reposition the camera and target, snap another picture, and watch it develop.
People have chided me: What is the point of going to this place if you have already seen it? My usually graphic response is something to the effect: If you think looking at a photo of a great meal is the same thing as eating it, well, you got a big problem. I could use some more graphic analogies, but you get the ideal: seeing the picture just heightens the anticipation.
 Strictly speaking, VP is a fractal imaging program (What are fractals? Whew. That is the subject of entire sets of websites. You can start with the Fractal FAQ, but in the meantime, just think of them
as complex shapes.) that processes arrays of data to make 3D pictures. VP uses artificial intelligence, chaotic math, and fuzzy logic to produce land forms from the arrays by drawing thousands to millions of polygons - many sided shapes - between the points in the array. The picture does not look like a photograph, but rather a very accurate landscape painted by one of the nineteenth century artists.
Strictly speaking, VP is a fractal imaging program (What are fractals? Whew. That is the subject of entire sets of websites. You can start with the Fractal FAQ, but in the meantime, just think of them
as complex shapes.) that processes arrays of data to make 3D pictures. VP uses artificial intelligence, chaotic math, and fuzzy logic to produce land forms from the arrays by drawing thousands to millions of polygons - many sided shapes - between the points in the array. The picture does not look like a photograph, but rather a very accurate landscape painted by one of the nineteenth century artists.
Vistapro is really flexible. You can add rivers and lakes to the land forms, change the kinds of trees that are rendered, or their density, how far up the sides of the valleys the trees go, the snow line, the tree line, the angle of the lighting, the color of the rocks and ground, etc. You have total control over the position of the camera and target, and the focal length of the "lens" that you are viewing the scene with (real wide angle to super telephoto). One of the most powerful capabilities is the scripting program, capable of animating flight sequences through the terrain you are viewing. Briefly, you scribe a flight path across the terrain with your mouse. You can adjust the "nodes" of you path by changing their altitude or camera view. You then specify the flight characteristics of your craft (eg. Glider, cruise missile, helicopter, etc.), make a couple more mouse clicks, and let the computer grind away.
OK, OK, already. Sounds great, but where do I get the raw material for this software. Well, I will get to that. But first, a little refresher on topo maps. A 7.5 minute map (1:24,000 scale) is probably the type with which you are most familiar. They are highly detailed, since the scale designation means that every inch on the paper is equivalent to 24,000 inches (i.e., 2000 feet) on the ground. 1:62,000 scale ("15 minute quads") are the old style of topo maps. The USGS is now phasing these out, as the entire US (outside of Alaska) has been mapped with the 7.5 min maps. 1:250,000 scale maps (1 minute) are good overview maps. (1 degree of latitude = 60 minutes, so a 7.5 minute quad is 8 times more detailed that a 1 degree quad. Enough with the refresher.
 Digital elevation models (DEMs) are the raw material which VP uses to generate images. Think of
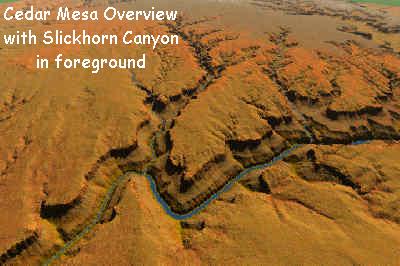
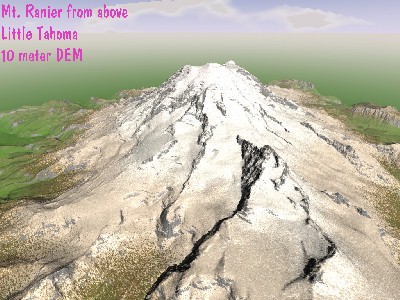
a topo map as a grid laid out at 30 meter (approximately 100 feet) intervals. To "make" a DEM, you would start at the SW corner of the map, go 30 m north, and take an elevation reading. Then go another 30 m, and take another reading. And so on, until you got to the upper edge of the map. Now go back to near the SW corner, go over to the next line (30 m east of the SW corner) and take the next reading. Keep doing this until you have an array of elevation data at 30 m intervals. This array of data makes up the bulk of the information in a 7.5 min DEM file. By using data points which are 30 m apart, the DEM will not be able to pick up every big rock or slot canyon so narrow that you have to turn sideways to go through. But the renderings are amazingly accurate with 7.5 min DEMs. 1 degree DEM files are typically 16 x larger than those of 7.5 min DEMs. But since they cover about 64x the land area, the amount of data that they use to describe a square mile of land is about one-fourth that of a 7.5 min DEM. Occasionally, you can find 10 meter resolution DEMs, and those are real joys. They still do not see every boulder, but a data point every 33 feet on the ground provides amazingly realistic resolution. You can check out some of the results of rendering 10 meter resolution DEMs in the Dark Canyon section of this website. There is an excellent, more detailed description of DEMs at a site sponsored by the Wisconsin State Cartographer's Office.
Digital elevation models (DEMs) are the raw material which VP uses to generate images. Think of
a topo map as a grid laid out at 30 meter (approximately 100 feet) intervals. To "make" a DEM, you would start at the SW corner of the map, go 30 m north, and take an elevation reading. Then go another 30 m, and take another reading. And so on, until you got to the upper edge of the map. Now go back to near the SW corner, go over to the next line (30 m east of the SW corner) and take the next reading. Keep doing this until you have an array of elevation data at 30 m intervals. This array of data makes up the bulk of the information in a 7.5 min DEM file. By using data points which are 30 m apart, the DEM will not be able to pick up every big rock or slot canyon so narrow that you have to turn sideways to go through. But the renderings are amazingly accurate with 7.5 min DEMs. 1 degree DEM files are typically 16 x larger than those of 7.5 min DEMs. But since they cover about 64x the land area, the amount of data that they use to describe a square mile of land is about one-fourth that of a 7.5 min DEM. Occasionally, you can find 10 meter resolution DEMs, and those are real joys. They still do not see every boulder, but a data point every 33 feet on the ground provides amazingly realistic resolution. You can check out some of the results of rendering 10 meter resolution DEMs in the Dark Canyon section of this website. There is an excellent, more detailed description of DEMs at a site sponsored by the Wisconsin State Cartographer's Office.
So where does one lays ones hands on such files, and how much do they cost? Well, as usual, that requires some explanation of the kinds of DEMs that are out there. First, are the "native format" DEMs. These are files that are in the original format specified by the US Geological Survey. Essentially, these are ASCII text files, and you can take a look at their structure by opening them up in a word processor. You will see the header information, which is the information as to where the DEM fits into a grid, and then information about the number of rows and columns of data. I like working with these best, because you will occasionally find mistakes in the data, and you can go into the data and edit it with a word processor, saving it, of course, in original ASCII text format. The second format of files is the so-called Spatial Data Transfer System (SDTS) format. This seems to be the way the world is moving, and I have read that there are really good reasons, but then politicians who raise taxes always tell you that it will actually save you money. Basically, the SDTS format DEMs are a compressed archive of many many files. When you download the files, you must un-gzip and un-tar them, making sure you have the Tar File Smart CR/LF conversion turned off in WinZip. If you want to view them in their native format, then you have to convert them using a utility called SDTS2DEM.exe You can find that at a free source for DEMs that I will mention below. (Tip, download each gzipped file into its own directory, 'cause you are going to have a mass of files to keep straight. You may find some errors in thes maps. You will notice the errors if you try to view them with the free USGS Viewer that you can download. In these cases, you can manually fix the errors (usually an unrealistically high elevation) by importing the DEMs, which are ASCII text files, into a word processor, mannualy changing the elevations, and saving the file as ASCII text, before renaming it as a DEM. Most of the time, the errors are on the first or last block of data in the file. Finally, VistaPro uses its own "binary format" DEMs. To convert the native or SDTS format DEMs into the binary format DEMs that the program can use, you will need to use the conversion software that comes packaged with VistaPro. The neat thing about the conversion software is that it also can paste large numbers of DEMs together befor it chops them up into the VistaPro binary format. That is an extremely useful capability, since often, you will want to see how a large area looks, one that spans several USGS quads.
Ok,finally, we come to where you can get the DEMs one needs to "feed" VistaPro. Well, the nice thing is that you can get them for free. For a while, the USGS was making them available on their website, but that activity has been "privatized," like so many former government activities these days. The GIS DataDepot makes available all the SDTS format 30 m resolution DEMs for free on a slow connection (about 5KB per second). If you want them faster, you can pay at their web site for that priviledge. However, there are places that you can get native format DEMs for free. And finding these stashes of goodies is almost as much fun as coming across an acre of untouched blueberries high atop Shining Rocks Wilderness. 1 degree DEMS are free for the downloading from the USGS. They are not as detailed (see above) as the 7.5 min DEMs, but they are useful for overall views of large areas of terrain. But there are also 7.5 min DEMS that you can find that are free. For example, Penn State maintains a large number of 7.5 min DEMs which cover most of the Pennsylvanian mountains, as well as some other spots in Appalachia (including six maps in the Great Smoky Mtns National Park). Other free sources of 7.5 min native DEMs are: Washington State; Wyoming, California, Colorado, and New Jersey, and our home state, Tennessee . There is a real treasure trove of data for Utah at their GIS Data Site. You can also buy those that you can't find directly from the USGS.
 Vistapro 4.1 is very powerful software at a very unsophisticated price: $40 street price in either Windows or Mac format. It is available now through VendorNation.com. I used to have a section in this write up about VP's harware requirements, but frankly, the average computing capacity has increased to the point where VP will render images fairly quickly. But it depends on the size of the area you want rendered and the complexity of the scene, etc, and of course, the speed of your microprocessor. The number of calculations required to compute the millions of polygons which make up a scene is staggering, and seems to be dependent on the microprocessor speed, up to a point. I recall upgrading what is now an "older' system from a 450 Mhz Pentium II to an 800 Mhz PIII, and the rendering time for a complex scene was halved. Running the same scene on a 2 Ghz P4 halved the speed again. My experience is that typically scenes will take a couple of minutes to render. But even with a higher horsepower machine, the flight animations - which are great fun to show to your hiking buddies - are not for the hard drive "impaired" (or the impatient). A 50 second show (yes, you can add a couple of MB of music to make a true multimedia production) at full frame (eg 800 x 600 pixels) at 15
frames per second will take up about 200 - 400 MB of hard drive space, and can take the better part of a day to generate. A great thing to start when you are leaving for a weekend backpack.
Vistapro 4.1 is very powerful software at a very unsophisticated price: $40 street price in either Windows or Mac format. It is available now through VendorNation.com. I used to have a section in this write up about VP's harware requirements, but frankly, the average computing capacity has increased to the point where VP will render images fairly quickly. But it depends on the size of the area you want rendered and the complexity of the scene, etc, and of course, the speed of your microprocessor. The number of calculations required to compute the millions of polygons which make up a scene is staggering, and seems to be dependent on the microprocessor speed, up to a point. I recall upgrading what is now an "older' system from a 450 Mhz Pentium II to an 800 Mhz PIII, and the rendering time for a complex scene was halved. Running the same scene on a 2 Ghz P4 halved the speed again. My experience is that typically scenes will take a couple of minutes to render. But even with a higher horsepower machine, the flight animations - which are great fun to show to your hiking buddies - are not for the hard drive "impaired" (or the impatient). A 50 second show (yes, you can add a couple of MB of music to make a true multimedia production) at full frame (eg 800 x 600 pixels) at 15
frames per second will take up about 200 - 400 MB of hard drive space, and can take the better part of a day to generate. A great thing to start when you are leaving for a weekend backpack.
There are a variety of landscape generating programs available. One literally can spend anywhere from $50 to $5000. Many of the super-sophisticated programs, like World Construction Set and Visual Nature Studio, appear to be more for game designers and professional engineers, who really want to be able to "build" a world. I would imagine that these programs require lots of time to really become proficient with them. One of the most popular programs for landscape rendering is Bryce, now in version 5.0 and available from Corel (who purchased MetaCreations a couple of years ago. My experience with Bryce has been, well ....... I own version 4, which can import SDTS DEMs directly, but it is very hard to generate a realistic scene without spending enormous amounts of time. The interface is not easy to understand, and frankly, the images just do not look very lifelike. I think that one of VistPro's great strengths is that it "knows" that trees do not grow on cliffs, and can generate a life-like scene with very little work at an inexpensive price. It is easy to learn, and fun, because one can get good-looking results quickly.
I use VP as a planning tool for backpacking trips, but it is a superb teaching tool. It is great to be able to show someone who has never really got the hang of topographical maps a spot on the map, and then render the same seen before their eyes. It makes all those lines really mean something. But mostly, I use Vistapro for fun. It is great to be able to be able to look at terrain you have not seen before, or old favorites from a different angle. I have used VP to render images of Yosemite, the Beartooths in Montana, many, many Utah canyons, the North Cascades, Olympics, Denali National Park, and the aforementioned area of Wrangell St. Elias National Park, Chitistone Canyon. Hey, where DO you want to go today?
© Roger A. Jenkins, 1998, 2000, 2002, 2003